Tetra Master is the optional card game in Final Fantasy IX. At first glance, it seems similar to Triple Triad — the card game from Final Fantasy VIII. And while you can develop a general intuition for how to win, especially if you have strong cards, after playing over a hundred matches, I had to admit something: just playing the game and reading all the in-game tutorials wasn’t enough to truly understand the rules. Eventually, I gave in and started looking things up to figure out what I was missing. The complete absence of any actual rules — whether in the game or the manual — left me utterly frustrated, which is what led me to write this article, illustrated in OCaml.
The Hell of Tetra Master
Just to be clear, my salty critique is aimed solely at the Tetra Master card game. While I can fully understand (and even agree with) some of the criticisms directed at the ninth entry in the series, I personally enjoyed the game a lot — maybe out of nostalgia. And since the card game isn't required to progress through the main story, it's entirely possible to enjoy the game while carrying only a mild sense of frustration at not grasping the intricate — and arguably unguessable — mechanics of its ruleset.
Some people will probably find it pretty strange to revisit this game more than 22 years after its European release... and honestly, they’re not wrong! I have to admit, I find it quite amusing to try and turn this website into a sort of dusty old library, filled with useless knowledge.
Context
I discovered the Final Fantasy series through its seventh installment in the late ’90s, watching my cousin Thomas play it with rapt attention. I was deeply impressed and quickly became a big fan of the series for its atmosphere, music, and stories. That said, being very young at the time and having only played JRPGs like Pokémon Red, I didn’t care much about game mechanics — which might sound awful to you, as I was missing out on what truly makes a video game a game — so I rarely read the tutorials and just focused on progressing through the story.
Even though the Final Fantasy series — at least the entries released in Europe at that time — isn’t known for being particularly difficult, ignoring the understanding of systems like the materia system in Final Fantasy VII can make progressing through the adventure very challenging. And yes, while Final Fantasy VI, VII, VIII, and IX have a similar Skill Ceiling to Pokémon Red and Blue, I have a feeling that the Skill Floor for those three Final Fantasy games is significantly higher.
Holding a fondness for these games I had never finished, years later I decided to play them again with the goal of completing them. At that time, as a programmer, my interest was focused on the RPGMaker series — a toy software for building RPGs that offers a programming interface to create original systems and grants great customization freedom for advanced users. Playing classics from the genre seemed like a perfect way to learn!
Since JRPGs are often long games and I wasn’t playing like a hardcore gamer, nearly 10 years later, after finishing FF6, FF7, and FF8, my takeaway was clear: reading the tutorials and understanding the various game mechanics makes the experience much easier. While each of these entries has its own subtle complexities related more to the Skill Ceiling, overall the games were quite simple — which isn’t a criticism — and I was ready to dive into FF9 with confidence.
Simple, but not in every aspect
Like its predecessors, Final Fantasy IX isn’t a complicated game. The mechanics are easy to grasp, and although battles can sometimes feel slow-paced — and the Trance system can be frustrating if you’re coming from the previous two games — it’s pretty clear how to be effective quickly. My frustration, however, comes from the card game. Like its predecessor, the game includes an ad-hoc system called Tetra Master, which is introduced fairly early in the story. As a player, I’m generally quite supportive of having multiple ad-hoc systems, especially in JRPGs, which usually have long playtimes and, at least back then, were often linear; these systems can sometimes shake up the pacing and add fun side quests. In the game, Tetra Master is presented as a simple card game, and you can quickly get your first cards and learn the supposed rules.
After more than a hundred matches, and having carefully read the various fragments of rules scattered throughout the game — especially through Jack’s tips — I came to this conclusion: I was never truly confident during a match, because even though I grasped the general idea of the game, something seemed to be missing in my understanding of the rules.
Discovering the Rules Online
Frustrated that despite my experience with the game, I seemed to be missing several subtleties, I did what I couldn’t do back then (around 2000) — I searched online. I was amused to find that, even in 2023, there are still websites that look like they’re straight out of the early 2000s, yet form an impressive knowledge base on the series. On those sites, I found detailed Tetra Master rules, and sure enough, I was missing a lot of pieces to fully understand the game’s rules. During my research, I also came across many forum posts from players just as disillusioned as I was. Once I discovered the rules, another question naturally arose: "How did these sites figure out these rules?"
My first instinct was to check out the original
manual,
which includes a section dedicated to Tetra Master (pages 22 and
23). Unfortunately, it doesn’t provide more information than what
you learn in the game. However, the Card Ability Points box on
page 22 states:
Every card has a set of numbers and letters that represents the strength of the card, which comes into play during card battles. Generally, the higher the number, the stronger the card. Try to figure out the effects of numbers and letters on each card.
Goodness, the manual taunts us! Digging deeper, I found a mysterious document, published in November 2000 and updated until June 2001, which appears to be the foundation of the collective knowledge about the game’s rules. The result of thorough investigation — including inquiries to Squaresoft and probably some reverse-engineering — this document was created to establish a comprehensive set of rules for the game to be adapted into a board game and seems to be the product of a remarkable collaboration.
Another very amusing aspect of the document, beyond explaining the rules, is that it highlights an extraordinary quote from a certain Drew Cosner, a member of the editorial team of the now-defunct The Gaming Intelligence Agency, a site that closed in 2015 and specialized in video game reviews.
Anyway, here it is: how the hell are you supposed to play Tetra Masters in FFIX? As far as I can tell, you place your cards on the board at random and your opponent randomly puts his cards down causing random cards to flip over at random, leading to the random card battle which is apparently won completely at random. In the end, one of you wins. At random.
Proving that I wasn’t the only one baffled by the rules, I’m simply joining, 20 years later, the community of players disillusioned by this strange card game — yet one so beloved by the inhabitants of the fictional world where the story of, nonetheless, the excellent Final Fantasy IX takes place.
The Tetra Master
As I mentioned in this very long introduction, since the release of the "mysterious document," there have been plenty of online resources to learn the rules of the infernal Tetra Master. So why bother writing a new one in 2023? Even though this article is mainly meant to vent about the complexity and non-discoverability of the rules, I believe documenting the full rules, in my own way — but based on the aforementioned document — will support my points and also, somewhat selfishly, add content to my site.
Cards in the Story
The cards are introduced very early in the game’s lore. In fact, they seem to spark a special interest from Bibi right from the very beginning. By the way, during the Festival of the Hunt, Bibi demands the Aerotheatre card as a reward — a card far superior to those typically acquired at this point in the adventure. Although the cards don’t affect story progression or provide any bonuses, we learn that many inhabitants of the game’s world play this card game, and there’s even a card tournament (which you can safely lose without consequences).
While these cards don’t grant any additional bonuses, they satisfy the collecting obsession of certain players. Like many ad-hoc systems in JRPGs, card matches offer a slight break from the game’s linearity, building a web of small side quests that intertwine with the main storyline and other side quests and systems.
In short, if the rules of the game had been inferable, its integration would have been, in my opinion, an excellent idea (somewhat like FF8’s Triple Triad). Unfortunately, as we’ll see... that’s absolutely not the case!
Collecting Cards
Since the cards are part of the game’s story world, it makes sense that there are multiple ways to collect them. After discussing the various methods for acquiring new cards, I will try to subjectively determine the most effective approach:
-
Receiving Them from Characters
This is the first way we encounter cards. Right from the start of the adventure, Bibi will have the chance to collect cards and be taught the basics of the game (yes, just the basics — absolutely too little information to actually understand the rules. Damn NPCs, incapable of giving us comprehensive information). -
Finding Them
Like any respectable JRPG, dungeons and villages are full of treasures. In FF9, besides chests, you can discover hidden items — brushing past them will reveal a speech bubble with an exclamation mark. Sometimes, you'll find cards this way. Note that cards can also be part of treasures uncovered using Chocographs. -
As a reward for battles
Sometimes, certain opponents reward you with one or more cards. More often than not, the card you receive corresponds to one of the monsters present in the fight — logical, for once. -
Buying Them
You can purchase cards for100 gilsin the town of Treno. Since the price is very low, the cards available for sale are, by default, relatively unremarkable. -
Winning Them
We’ll go into detail about the rules later, but winning card matches allows you to take one or five cards from your opponent upon victory. Since some NPCs are experienced players — especially in the Treno card tournament — it’s possible to collect powerful cards once you reach a certain point in the game.
Naively looking at this list, one might quickly conclude that the most effective way to collect the maximum number of cards is to challenge as many opponents as possible. However, and this is the core of this article, since the game is very complicated, I firmly believe that to build an effective deck, it’s better to fight as many monsters as possible. Indeed, monsters encountered randomly have a chance to drop a card as a reward. Besides the card, fighting monsters also grants experience and other items, giving card collecting a concrete purpose tied to progressing through the adventure. That said, challenging opponents is also necessary, as we’ll see when we delve into the rules in detail.
A Brief Note on Randomness
Each card has several attributes that determine its strength, so two cards with the same artwork can actually differ. A point that is both fun and frustrating is that these attributes aren’t set until you actually obtain the card. In other words, cards given by other characters or found in villages and dungeons have their characteristics determined upon discovery. It’s therefore possible — and recommended — to save your game before collecting a card and reload until you’re satisfied with its stats. This trick works for all cards, including rare ones.
Throughout this guide, I will frequently complain about randomness, which amplifies the game's non-determinism. The variability in the stats of a card found or received is the first clear example of this.
The Rules According to the Manual
As mentioned in the context section of this article, the original manual devotes two pages to Tetra Master. Overall, the information provided in the manual isn’t much more detailed than what you can gather in the game. However, to help you understand my frustration, I’m going to paraphrase it here — which will make the detailed explanation following this section all the more impressive!
Challenging an Opponent
This is probably the most comprehensive part of the guide: indeed, some NPCs play cards. To challenge them, simply approach and interact by pressing the square button.
Basic Rules
This section outlines the game flow in very broad terms, leaving out many details:
You and your opponent take turns placing 5 cards each on a 4x4 grid. Cards can be won from your opponent depending on where they are placed. Once all cards are placed, the player who owns the most cards wins.
From this, we understand that the goal is to capture as many of your opponent’s cards as possible. What follows are the different methods of capturing cards.
Winning a Card
In the various diagrams, black cards represent the player’s cards and gray cards represent the opponent’s. The card marked with a circle is the one that was just placed, and the arrow between card patterns indicates the effect of that placement.
"You win an opponent’s card when an arrow on your card points toward the opponent’s card."

From this first (very incomplete) bit of information, we can deduce several things:
- Cards have arrows — since the opponent’s card in the example has none, we can assume that cards have a variable number of arrows, pointing in different directions;
- It’s reasonable to assume that cards must be adjacent for one to be captured;
- A captured card stays in its position but changes color to reflect the player who now owns it.
"If an arrow on your card faces an arrow on your opponent’s card, a battle occurs. The numbers shown on the cards are subtracted, and the card with the higher resulting value wins the other."

The battle mechanic, as shown in the diagram, reveals new elements about how the game works:
- Cards have stats;
- It confirms our earlier assumption that the arrows on cards vary.
"When you win a battle, all cards targeted by the arrows of the newly captured card are also captured."

The main idea illustrated by this diagram is that, in addition to the arrows, it’s possible to create a capture chain — a combo that spreads the success of a capture to all adjacent arrows. However, this section raises more questions than it answers:
- Do combos propagate recursively? (This can be answered quickly by playing a few matches)
- If a captured card — as part of a combo — is placed into a battle scenario, does that battle still occur?
As mentioned in the introduction, the manual states that cards have stats — something we also saw during the battle example. However, it explicitly says that it won’t explain how to interpret those stats, and as we’ll see, deciphering them is far from straightforward without help.
Rewards and Penalties
At the end of a match, the winner can choose one card from those they successfully captured from the opponent. However, if the winner manages to capture all of the opponent’s cards — achieving a Perfect Game — they get to take all of the opponent’s cards. This is quite a windfall when you win, but can be incredibly punishing if you lose.
We also learn that it’s possible to reclaim lost cards by rematching NPCs who have defeated you.
Card Limit and Menu
A small note tells us that you cannot own more than 100 cards and that you can get rid of cards from the card menu. This is a strange choice because, as the card menu reveals, there are 100 different cards in total. We can therefore assume that once you are advanced in your card collection, building a strategy that uses multiple copies of the same card becomes difficult. Moreover, consulting this menu anticipates the frustration you'll feel during your first games, as it displays information that cannot be linked to what you learned from reading the manual.
Conclusion from Reading the Manual
Although some aspects remain unclear, one might think that the general logic of the game has been grasped and that these uncertainties will disappear through playing. Let me reassure you right away: this is absolutely not the case. While the manual offers a few strategies — quite easy to discover on your own and thus not included here — it seems to deliberately leave a set of unknowns for players to figure out in-game. However, if you’re like me, you’ll find that the combination of randomness and sparse information, especially regarding card stats, makes this discovery tedious — if not impossible — which has made Tetra Master the subject of many mockeries. Fortunately, thanks to the internet and the patience of some enthusiasts, the rules are now known, and in the following sections, I’ll try to provide a clear description! The only two points I won’t revisit are using the square button to start a match and the rewards, mainly because these are probably the only parts thoroughly explained in the manual (thankfully).
Without further ado, let’s dive into a meticulous description of Tetra Master’s rules. You’ll see, the surprises are far from over.
Detailed Rules
Since the game is played between two players, each starting with five cards, the two prerequisites are:
- Have at least 5 cards;
- Find an opponent.
Once these conditions are met, starting a match involves interacting with a character using, by default, the square button. You will be asked to choose the five cards you want to use. One might argue that ideally you should pick your five best cards; however, since you can lose either one or all five cards, you also need to weigh the risk and reward (as we’ll see later, combos can turn the tide).
When a match begins, a coin toss decides who places the first card — the player has a 50/50 chance to start. After that, each player takes turns placing one card at a time.
Game Board
The game board is a 4x4 grid, consisting of 16 spaces. To add
variety, the start of a match can randomly block between 0 and 6
spaces (once again adding randomness), where no cards can be
placed. Since a maximum of 6 spaces can be blocked, there will always
be enough room to play all five cards.
Here are three examples of possible boards. The first has no blocked
spaces, the second has 3 blocked spaces, and the last has 6
blocked spaces.
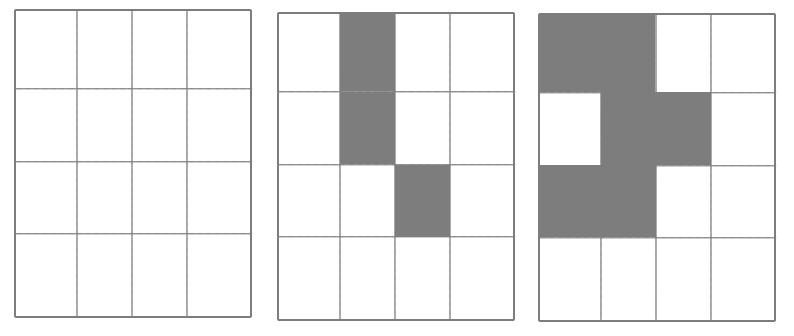
Although I complained about the excessive randomness in the introduction, here I find the slight variations in the board layout to be a very good idea, allowing players to devise complementary strategies. For example, in the third example, the isolated spot with no adjacent free spaces lets you place a weaker card that can never be captured, preventing a perfect defeat and ensuring that, at worst, you lose only one card.
Simple Card Capture
We saw in the manual that to capture a card, you simply place a card, and all cards pointed to by its arrows are captured. In this example, the black card captures three targeted cards.
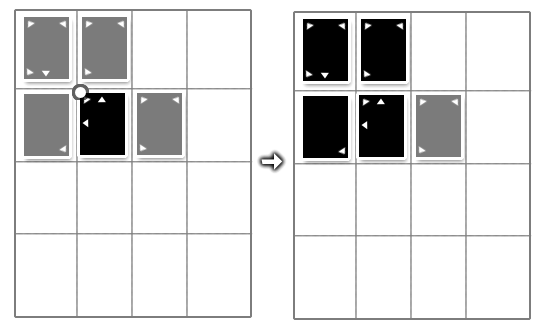
However, for the arrows to be effective, the card must have just been placed. In this diagram, the grey card does not affect the newly played black card:
Because a played card is offensive, and once placed, it switches to defensive mode. For a card that has already been placed to capture another, a battle and/or a combo must occur — both of which we'll explain in the following sections.
Battle
At this point in the article, you might be thinking I’ve been exaggerating the game’s complexity — and that, even if the manual wasn’t thorough, a few matches should be enough to grasp the full mechanics! Rest assured, in this section, we’ll quickly see why playing Tetra Master without understanding key information tied to card stats — which only become apparent during battle situations — leads to constant low-grade anxiety. You’ll frequently find yourself unsure of why you’re winning... or worse, losing.
As a reminder, when placing a card adjacent to another card of a different color, several scenarios can occur:
- If the placed card points to one or more opponent cards, and none of those cards have arrows pointing back, it simply captures all targeted cards.
- If the placed card doesn’t point to any opposing card — even if it is pointed at by an already-placed card — no capture happens.
- If the placed card points to one or more opponent cards and one of those cards points back, a battle occurs. The placed card is the attacker, and the targeted card is the defender.
We also read that, in a battle situation, the card with the highest number wins. And what’s amazing is... before diving into the rules, the obscure document, and a few attempts at reverse engineering, I was completely unable to understand how that number was determined. Buckle up — I think this is the point where the designers of Tetra Master — and whoever signed off on the Game Design Document — completely lost it. Because from my perspective, even after playing thousands of matches, it’s impossible to figure out how this number is defined.
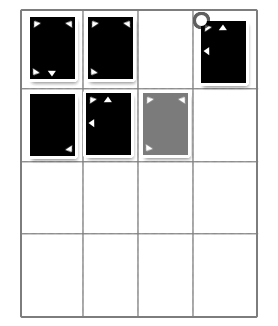
Multiple Battles
Although we haven’t yet fully broken down the anatomy of a card, we’ve speculated that a card can have multiple arrows, potentially pointing to several different cards. For example, in this situation:
In this situation, we can see that the played card is in a battle situation with both opposing cards. While the game usually decides randomly or applies a questionably explicit rule to determine battle order, the attacking player chooses which card to attack first. This allows for genuine strategic play, as we’ll explain further when discussing combos.
Card Anatomy
A card — which is generally more visually appealing than my simple
diagrams — can have between 0 and 8 directional arrows, each
representing an attack direction — and, as we’ve seen in battles, also
defense directions. It might seem strange to have (and use) cards
without any arrows, as they would be completely ineffective — only
able to be captured and never able to capture others. However, such
cards can be surprisingly useful to break combos or, as a last move,
to simply add a +1 to your count of captured cards.
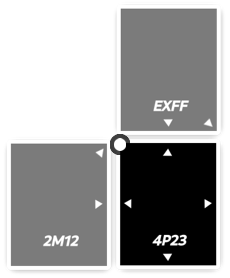
Next, each card has a sort of cryptic identifier, hard to decipher —
especially on a CRT television. For example, here is the diagram of a
card that can attack in all directions, with the identifier: 1P23:
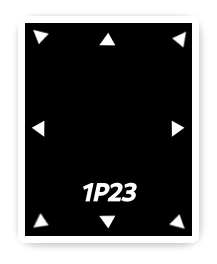
I believe we have a fairly good grasp of the arrow mechanics and their role, so we can speculate that the identifier describes a card’s stats and is used to calculate the number that determines a battle. That’s exactly right, but we’ll see there are many implicit rules making the understanding of these numbers very challenging.
Reading a Card’s Statistics
From my perspective, it’s probably impossible to deduce the
relationship behind that infamous identifier (in our example, the
notorious 1P23). So I’ll be very explicit: it provides four pieces
of information about the card, in this format: PTDM, where:
Pis the card’s offensive power, expressed in hexadecimal, from0toF; in our example, the value is1.Tis the card type, which can beP,M,X, orA; in our example, the value isP.Dis the card’s physical defense, also expressed in hexadecimal, from0toF; in our example, the value is2.Mis the card’s magical defense, also expressed in hexadecimal, from0toF; in our example, the value is3.
I assure you that the fact that these digits are expressed in
hexadecimal can be very confusing once you start progressing in the
card adventure. Indeed, neither the game nor the manual ever
explains how to read these statistics. Having been used to seeing at
least three digits, suddenly seeing letters appear can cause a lot of
confusion! Especially since the statistic AAAA is perfectly
valid. So even if, like me, years after your first encounters with
Tetra Master, you have a background in computer science and decide,
naively, to give its baffling complexity another try — even if you
are already familiar with the hexadecimal numbering system — chances
are you won’t realize it’s actually hexadecimal, since the pattern of
the statistics doesn’t look anything like a number expressed in any
known numeric system.
Before diving into the concrete meaning of these hexadecimal values (because yes, it’s way more complicated than you might think), let’s look at the different types of cards:
-
P(for physical) is a card that uses its offensive power to attack the physical defense of another card. For example, in a situation where7P23attacks2M12, we roughly have7vs1. -
M(for magical) is a card that uses its offensive power to attack, logically, the magical defense of another card. For example, in a situation where2M12attacks7P23, we roughly have2vs3once again. -
X(for ... power (haha) or, according to some translations, flexible) is a card that uses its offensive power to attack the weaker of the two defenses of another card. So, in a situation where7X12attacks2M32, the card targets the magical defense. Roughly speaking, once again, it’s7vs2. -
A(for advanced or assault) is a card that uses its highest statistic (whether offensive or defensive) to attack the lowest relevant statistic (including offensive power) of another card. For example, in a situation where2A8Fattacks1X2F, the card uses its magical defense to target the opponent's offensive power, roughlyFvs1.
This allows us to assert that FAFF is the best possible stat
combination for a card. We’ll see later that cards can be upgraded,
but one challenge at a time! First, let’s look at how to interpret the
hexadecimal digits.
Interpreting Hexadecimal Statistics
Since the statistics expressed in hexadecimal only cover 16 values (0
to F), ties would happen quite often. But don’t worry, the game has
another surprise in store for us—one that is also completely absent
from the game manual or any in-game rule explanation. Indeed, it would
be far too simple if 9 simply meant 9 or F meant 15!
The statistics expressed in hexadecimal actually describe
intervals. This means that, for example, if EP12 attacks 2ME2,
the two Es represent potentially different concrete values. It’s
obvious that, for ergonomic reasons (I’m being sarcastic), it is
impossible to know the exact values of each card within the game
interface. Here is the list of possible value intervals for each
level (using the usual open
interval
notation where [a, b] means x >= a && x <= b):
| Stat | Interval | Stat | Interval |
|---|---|---|---|
0 |
[0, 15] |
A |
[160, 175] |
1 |
[16, 31] |
B |
[176, 191] |
2 |
[32, 47] |
C |
[192, 207] |
3 |
[48, 63] |
D |
[208, 223] |
4 |
[64, 79] |
E |
[224, 239] |
5 |
[80, 95] |
F |
[240, 255] |
6 |
[96, 111] |
||
7 |
[112, 127] |
||
8 |
[128, 143] |
||
9 |
[144, 159] |
Since there are always 16 possible values per statistic, we can
easily describe a systematic formula to define the interval from a
hexadecimal digit (in the formula, named n):
let min = to_decimal(n) *. 16.0
let max = min +. 15.0
let range = (min, max)
Indeed, some numbers should raise suspicion (for example, 32, 128,
or even 255). In fact, n can be expressed as nF, meaning each
stat point (offensive power, physical defense, and magical defense)
ranges from 0 to 255. To illustrate my point, the card 4P0E will
have:
- an offensive power between
64and79; - a physical defense between
0and15; - a magical defense between
224and239.
Once you know this, it’s fairly simple; however, since there is no way to explicitly know the exact position within the interval, we will, from a practical standpoint, use the minimum value of the interval to minimize false positives. Now that we have all the keys to correctly (though unfortunately only partially) read a card’s statistics — which I believe is totally overcomplicated and, I repeat, probably impossible to deduce just by playing — we can observe how a battle unfolds, which obviously adds complexity and randomness. Lovely.
Battle Progression: Even More Randomness
Now that we can read a card’s statistics, combined with understanding the arrows and card capture mechanics, we should have enough elements to figure out how to win every match. Although we still need to cover the combos, which depend on the card positions on the board and will be detailed in the next section, one might think we have enough information to win local battles. However, experienced players will quickly realize that the numbers displayed on the cards during battles fluctuate and, even worse, scenarios that seem inevitable sometimes don’t play out as expected!
For example, imagine a battle between the cards 3P10 (attacker) and
2M02 (defender). We’re pitting a physical 3 (with power
between 48 and 63) against a 0 (defense between 0 and
15). If our interpretation of the stats is correct, there’s no
scenario where the attacking card should lose. And yet, it
happens. Indeed, there are certain random factors that allow a
weaker card to win a battle. This is why, during a battle, you’ll
see multiple numbers flashing on the card—reflecting the application
of these random factors.
Let’s revisit our example: 3P10, which we’ll call X, attacking
2M02, called Y. As mentioned, we pit 3 against 0. Suppose the
following:
X's attack value is50(within the range48to63);Y's defense value is7(within the range0to15).
These are the initial numbers displayed (and thus the only way to know
the position within the interval), even though, as we’ll see later,
this isn’t reliable for long-term strategy since cards can
evolve. Additionally, in certain situations — like when in a
defensive position — it’s hard to know which statistic is
prioritized. For example, with 1P22 against a card of type X, how
can you tell if the displayed number targets magical or physical
defense?

Next, the computer will generate a random number between 0 and
the previously displayed number (so for X, between 0 and 50, and
for Y, between 0 and 7). We’ll call these numbers the
rolls. For this example, let’s assume the following:
Xrolled a46;Yrolled a1.
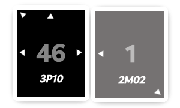
The rolls are subtracted from the actual values within the
interval. Since each roll is between 0 and the actual interval
value, the results can never be negative.
Xends up with50 - 46 = 4;Yends up with7 - 1 = 6.
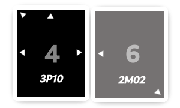
And the card with the highest subtraction result wins. Here, against
all expectations, it’s the gray card (which seems much weaker) that
wins (because... logically 4 < 6). So, we end up fucked (sorry),
and our black card is captured.
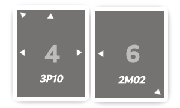
We realize that the rolls heavily influence the battle’s
outcome. Indeed, the higher the roll, the greater the risk of
defeat because the roll is subtracted from the concrete number
within the interval. For example, if card X had rolled a 30, the
result would have been 20 vs 6, and the black card would have
won. Our example was deliberately pessimistic since we assumed a very
high roll. However, in terms of probability, the black card had about
a ~92% chance to win. Still, that leaves roughly an ~8% chance of
defeat, which can leave players unfamiliar with Tetra Master's complex
mechanics puzzled and frustrated. Moreover, this rule depends on many
factors difficult to control, like the precise position within the
interval, combined with randomness—all in a poorly explained game with
hard-to-understand statistics. In my view, this randomness adds a
huge amount of entropy to understanding the rules, somewhat
justifying the comments of Drew
Cosner,
cited at the beginning of this article, about the game’s random
nature.
In terms of user feedback, seeing a card display the number 40 and
still lose to a card showing 3 can be completely baffling (because
yes, the intermediate numbers — the roll and the subtraction — are not
shown at all).
Calculating the Probability of Winning a Duel
Calculating the probability of victory in a battle is fairly easy to
simulate. Here is an approximation which, for our example with X = 50 and Y = 7, yields about ~92%:
let proba my_stat opponent_stat =
  let a, b, need_reverse =
    if my_stat > opponent_stat then (opponent_stat, my_stat, false)
    else (my_stat, opponent_stat, true)
  in
  let x = 2.0 *. (1.0 +. b) and y = 1.0 +. a in
  let result = 100.0 *. ((x -. y) /. x) in
  if need_reverse then 100.0 -. result else result
However, this approach relies on two fixed values that are generally unknown during the game: the exact positions within the intervals. An (acceptable) solution would be to be very pessimistic when calculating these probabilities by taking the lowest bound of my card’s interval and the highest bound of the opponent’s:
let pessimist_proba my_stat opponent_stat =
  let my = to_decimal my_stat *. 16.0
  and op = (to_decimal opponent_stat *. 16.0) +. 15.0 in
  proba my op
This gives us a fairly good idea of the probabilities of victory (a bit pessimistic, but in life, isn’t it better to be cautious).
The funny thing is that once you know:
- how to read the compressed representation of the statistics;
- the random factors during battles;
- the more vague points (the exact number within the interval)
The rules become relatively straightforward, and even though players can sometimes be caught off guard by the randomness, with all this information, it is, in my opinion, possible to enjoy and play Tetra Master more calmly. While I’m jumping ahead a bit, the main frustration lies in how difficult it is to discover the rules just by reading the manual or playing the game. I find it quite odd that there was a deliberate choice to be so vague about how to read the cards and where randomness comes into play. Without further ado, let’s move on to combos which, surprisingly, are very predictable and understandable even without reading the rules (yay)!
By the way, if for some obscure reason you’re interested in the probability code, to streamline writing this article, I wrote a small program that easily gives me the pessimistic success percentage of one card attacking another. You can find the source code on my Github page. At the time of writing this article, the program doesn’t do much, but I might spend some time in the coming days/weeks/months/years to, why not, build a real Tetra Master simulator. But let’s not dream too much — the time it took me to write this article might well discourage me from going further.
Combos
It must be acknowledged that the manual is quite thorough regarding the flow of combos. Indeed, this time there’s no randomness, no implicit rules—the manual explains: "When you win a battle, all cards targeted by the arrows of the newly won card are also won." We could rephrase this as: "In a battle situation, all cards pointed to by the losing card (i.e., the card just won in the battle) are also captured."
It is important to highlight several points:
- Even if the flipped card points to another card during a battle, the other card is taken without a battle;
- Combo effects do not propagate recursively (so if a card is taken because it is targeted by the loser of a battle, the cards it targets will not be taken).
Combos can completely turn the tide of a match because it’s possible to flip up to 8 cards in a single battle. For example, in this situation:
This situation (artificial, I admit) shows how a single card position
can completely change the outcome of a game. Indeed, if the black
card wins (which seems normal given that in the worst case, 224
vs. 15, it has a 96.44% chance of victory), it will flip its
neighbor, which in turn will flip without any battle its 7
neighbors. In the current board setup, this means that regardless of
the next move, the worst-case scenario for the black player would be a
draw.
Combined with the multiple battles mechanic, combos introduce fun micro-strategic choices (and are quite rewarding when successful). For example, let’s revisit the example presented in the multiple battles section:
In this situation, we have the opportunity to choose whether to attack
the card above, which has stats EXFF, or to target the card on the
right, which has stats 2M12. To recap, the (pessimistic)
probabilities of victory are:
4P23vsEXFFwith only a12.70%chance of winning;4P23vs2M12with a75.38%chance of winning.
Since the card on the left also points to the card above, defeating the left card means capturing the top card by default. This makes it a far more strategic move! Combined with the blocks we discussed when detailing the game grid, and with some cards having no arrows (thus blocking combo propagation), there are many strategies to explore in Tetra Master when focusing on combos. In my opinion, this is an excellent mechanic — well documented and easy to grasp through play (even if understanding it can be a bit obfuscated by the difficulty of reading stats and the game's unpredictable randomness).
Pre-conclusion on the Rules
At this point, although there are still some topics to cover, we have skimmed through the entire set of rules for a match and normally, only unlucky rolls should make outcomes unpredictable. What we can pre-conclude from this detailed exploration of the game is that it actually seems quite fun! However, the absence of a comprehensive guide (in-game or in the manual), combined with random rolls, makes the game very frustrating, as demonstrated by this video.
That said, don't worry, Tetra Master still has a few surprises up its sleeve that directly impact gameplay, increasing randomness and making rule inference even more challenging. While these additions likely come from good intentions (at least, I hope so), they can end up generating even more frustration. Stay tuned.
Experience and Card Evolution
We touched on this a bit earlier, but cards can evolve within a defined limit (specific to each card), and as with many things in this game, this is determined in a rather random way. Indeed, throughout battles, cards can evolve in two different ways:
- their attack and defense stats (magical or otherwise) can evolve up to a certain limit;
- the card’s type can change as the adventure progresses.
And what’s really fun is that these two types of evolution can happen completely independently. In other words, a card’s type can evolve without it having reached its attack and defense limits. That’s why we’ll detail these evolutions in two separate sections, then provide a list of cards with the maximum stats they can reach.
Evolution of Attack and Defense
A card has one attack stat and two defense stats (physical defense and
magical defense). Remember, the indices shown on the card are
expressed in hexadecimal, ranging from 0 to F (15). These
indices don’t represent the card’s exact values but rather an
interval. While cards of the same design can have different numbers of
arrows and different concrete stats (their position within the
interval), when acquired, they are assigned attack and defense limits.
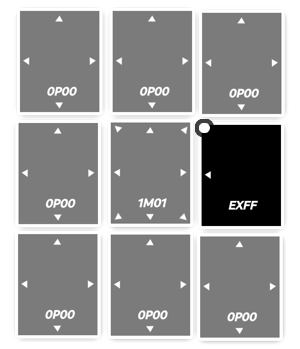
For example, the goblin card has, by default, the stats set 0P00,
meaning its actual attack and defense values can range from 0 to
15. However, through some obscure magic — because, naturally, in
a game so silent about its workings, being explicit about a card’s
maximum stats seems a bit overrated — we know a goblin can have at
most 7 in attack (still within the 0 interval), 9 in physical
defense, and 4 in magical defense. Yet, as long as a card hasn’t
reached these limits, it can continue to evolve.
Indeed, after each won match, every card used during the game will have one point added to either an attack or defense stat, chosen at random. This means that after each victory, each stat has a one-in-three chance of being incremented. The only way to know which stat was increased is to play that card again in a subsequent match and check its actual battle score to see which value went up.
An amusing aspect of this random choice of which stat to increase is
that it completely ignores whether the card has already reached its
stat cap. So, if our goblin already maxed out at 7 in attack but
has 6 in defense and 2 in magic defense, and luck decides to
increment the attack stat... that point is simply lost... meh.
Once again, the obfuscation of this information — and its randomness — serve to complicate the understanding of the game’s rules! Because yes, even though the idea of card experience is, in my view, a great concept that motivates players to keep playing, without informing the player about it, this mechanic essentially makes understanding the stats (and the numbers shown on the card during battles) even harder to figure out.
Evolution of Card Types
In addition to being able to upgrade a card’s attack and defense
stats, cards can also change type. Any card of type P or M can
evolve into type X, and any card of type X can evolve into type
A. These evolutions follow this hierarchy, which makes perfect sense
since type X is objectively superior to types M or P, while
still being inferior to type A:

Unlike the previous evolutions, which depend on winning an entire
game, cards can change type each time they win a battle (whether
they are on the offensive or defensive side). Specifically, when a
card wins a battle, a P or M type card has a 1 in 32
chance to evolve into an X card, and an X card has a 1 in 256
chance to evolve into an A card.
Even though the chances of evolution (of card type) are relatively
low, unlike the increases to offensive or defensive points, type
changes are much easier to track (since, logically, the type is
clearly displayed on the card). When we get to the final section of
this article — the collector’s level — we’ll see that reaching
level A with all cards is necessary, which makes it all the more
important to clarify the method for getting a card to reach that
level.
Card List
Since the maximum stats of the cards are of course not provided anywhere, here’s a list of the 100 cards available in the game, which I found here. Given that it’s been over 20 years, and I doubt these max stats will ever change, I’m taking the liberty of reproducing the list here, in the spirit of vendorisation (I couldn’t find a better translation — apologies). Here’s how the table is structured:
Name: the English name of the cardType: its original type (P,M,X, orA)Atk: the maximum number of actual attack points the card can reachDef: the maximum number of actual physical defense pointsMDef: the maximum number of actual magical defense pointsMStats: the highest displayable stat on the card (they’re all shown as typeA, since every card can eventually reach that tier)
Card list
| Id | Nom | Type | Atk | Def | MDef | MStats |
|---|---|---|---|---|---|---|
001 |
Gobelin | P |
7 |
9 |
4 |
0A00 |
002 |
Fang | P |
9 |
10 |
4 |
0A00 |
003 |
Skeleton | P |
11 |
12 |
10 |
0A00 |
004 |
Flan | M |
13 |
6 |
19 |
0A01 |
005 |
Zaghnol | P |
15 |
13 |
13 |
0A00 |
006 |
Lizard Man | P |
17 |
15 |
8 |
1A00 |
007 |
Zombie | P |
19 |
19 |
11 |
1A10 |
008 |
Bomb | M |
21 |
12 |
21 |
1A01 |
009 |
Ironite | P |
23 |
23 |
13 |
1A10 |
010 |
Sahagin | P |
25 |
18 |
4 |
1A10 |
011 |
Yeti | M |
27 |
6 |
26 |
1A01 |
012 |
Mimic | M |
29 |
20 |
27 |
1A11 |
013 |
Wyerd | M |
31 |
9 |
33 |
1A02 |
014 |
Mandragora | M |
33 |
15 |
39 |
2A02 |
015 |
Crawler | P |
35 |
36 |
8 |
2A20 |
016 |
Sand Scorpion | P |
37 |
37 |
17 |
2A21 |
017 |
Nymph | M |
39 |
12 |
38 |
2A02 |
018 |
Sand Golem | P |
41 |
38 |
16 |
2A21 |
019 |
Zuu | P |
43 |
11 |
34 |
2A02 |
020 |
Dragonfly | P |
45 |
40 |
19 |
2A21 |
021 |
Carrion Worm | M |
47 |
29 |
25 |
2A11 |
022 |
Cerberus | P |
49 |
45 |
4 |
3A20 |
023 |
Antlion | P |
51 |
48 |
27 |
3A31 |
024 |
Cactuar | P |
53 |
195 |
4 |
3AC0 |
025 |
Gimme Cat | M |
55 |
33 |
29 |
3A21 |
026 |
Ragtimer | M |
57 |
34 |
30 |
3A21 |
027 |
Hedgehog Pie | M |
59 |
22 |
40 |
3A12 |
028 |
Ralvuimahgo | P |
61 |
68 |
12 |
3A40 |
029 |
Ochu | P |
63 |
37 |
18 |
3A21 |
030 |
Troll | P |
65 |
62 |
34 |
4A32 |
031 |
Blazer Beetle | P |
67 |
91 |
18 |
4A51 |
032 |
Abomination | P |
69 |
59 |
58 |
4A33 |
033 |
Zemzelett | M |
71 |
32 |
96 |
4A26 |
034 |
Stroper | P |
73 |
64 |
8 |
4A40 |
035 |
Tantarian | M |
75 |
43 |
39 |
4A22 |
036 |
Grand Dragon | P |
77 |
65 |
71 |
4A44 |
037 |
Feather Circle | M |
79 |
45 |
41 |
4A22 |
038 |
Hecteyes | M |
81 |
10 |
70 |
5A04 |
039 |
Ogre | P |
83 |
80 |
29 |
5A51 |
040 |
Armstrong | M |
85 |
36 |
75 |
5A24 |
041 |
Ash | M |
87 |
50 |
50 |
5A33 |
042 |
Wraith | M |
89 |
80 |
17 |
5A51 |
043 |
Gargoyle | M |
91 |
51 |
47 |
5A32 |
044 |
Vepal | M |
93 |
52 |
48 |
5A33 |
045 |
Grimlock | M |
84 |
37 |
54 |
5A23 |
046 |
Tonberry | P |
41 |
54 |
50 |
2A33 |
047 |
Veteran | M |
90 |
30 |
145 |
5A19 |
048 |
Garuda | M |
98 |
72 |
29 |
6A41 |
049 |
Malboro | M |
86 |
57 |
99 |
5A36 |
050 |
Mover | M |
102 |
250 |
8 |
6AF0 |
051 |
Abadon | M |
125 |
105 |
45 |
7A62 |
052 |
Behemoth | P |
189 |
71 |
106 |
BA46 |
053 |
Iron Man | P |
197 |
110 |
12 |
CA60 |
054 |
Nova Dragon | P |
236 |
125 |
194 |
EA7C |
055 |
Ozma | P |
221 |
6 |
199 |
DA0C |
056 |
Hades | M |
250 |
200 |
20 |
FAC1 |
057 |
Holy | M |
134 |
40 |
63 |
8A23 |
058 |
Meteor | M |
190 |
162 |
2 |
BAA0 |
059 |
Flare | M |
208 |
17 |
17 |
DA11 |
060 |
Shiva | M |
83 |
6 |
95 |
5A05 |
061 |
Ifrit | M |
100 |
150 |
17 |
6A91 |
062 |
Ramuh | M |
74 |
29 |
103 |
4A16 |
063 |
Atomos | M |
66 |
100 |
100 |
4A66 |
064 |
Odin | M |
205 |
136 |
72 |
CA84 |
065 |
Leviathan | M |
183 |
100 |
22 |
BA61 |
066 |
Bahamut | M |
200 |
145 |
83 |
CA95 |
067 |
Ark | M |
226 |
96 |
90 |
EA65 |
068 |
Fenrir | M |
139 |
36 |
22 |
8A21 |
069 |
Madeen | M |
162 |
22 |
100 |
AA16 |
070 |
Alexander | M |
225 |
183 |
86 |
EAB5 |
071 |
Excalibur II | P |
255 |
180 |
6 |
FAB0 |
072 |
Ultima Weapon | P |
248 |
24 |
102 |
FA16 |
073 |
Masamune | P |
202 |
180 |
56 |
CAB3 |
074 |
Elixir | M |
100 |
100 |
100 |
6A66 |
075 |
Dark Matter | M |
199 |
56 |
195 |
CA3C |
076 |
Ribbon | M |
12 |
200 |
255 |
0ACF |
077 |
Tiger Racket | P |
12 |
5 |
19 |
0A01 |
078 |
Save the Queen | P |
112 |
60 |
10 |
7A30 |
079 |
Genji | P |
10 |
105 |
175 |
0A6A |
080 |
Mythril Sword | P |
32 |
4 |
6 |
2A00 |
081 |
Blue Narciss | P |
143 |
144 |
20 |
8A91 |
082 |
Hilda Garde 3 | P |
98 |
62 |
16 |
6A31 |
083 |
Invincible | M |
185 |
145 |
201 |
BA9C |
084 |
Cargo Ship | P |
45 |
100 |
10 |
2A60 |
085 |
Hilda Garde 1 | P |
99 |
75 |
2 |
6A40 |
086 |
Red Rose | P |
143 |
20 |
144 |
8A19 |
087 |
Theater Ship | P |
33 |
106 |
19 |
2A61 |
088 |
Viltgance | P |
228 |
145 |
32 |
EA92 |
089 |
Chocobo | P |
3 |
5 |
12 |
0A00 |
090 |
Fat Chocobo | P |
25 |
30 |
30 |
1A11 |
091 |
Mog | M |
3 |
5 |
12 |
0A00 |
092 |
Frog | P |
2 |
2 |
2 |
0A00 |
093 |
Oglop | P |
40 |
33 |
6 |
2A20 |
094 |
Alexandria | P |
4 |
178 |
100 |
0AB6 |
095 |
Lindblum | P |
6 |
100 |
178 |
0A6B |
096 |
Two Moons | M |
113 |
88 |
88 |
7A55 |
097 |
Gargant | P |
46 |
17 |
56 |
2A13 |
098 |
Namingway | M |
127 |
127 |
127 |
7A77 |
099 |
Boco | P |
128 |
127 |
127 |
8A77 |
100 |
Airship | P |
129 |
127 |
127 |
8A77 |
Now that you know how to level up a card’s stats and upgrade its type, it’s time to dive into the final layer of confusion this game has to offer... the Collector Level.
Collector Level
The rules of the game and the logic behind card evolution no longer hold any secrets for us—so it’s time to tackle the final mystery: the infamous Collector Level. When opening the card menu (from the main menu), you can view your entire card collection and see several statistics displayed.
- the number of games won
- the number of games lost
- the number of draws
- the
level, shown inp
The first three pieces of information shouldn’t (in principle) require any clarification. The game keeps track of played matches and provides a summary through this menu. However, what really draws our attention is the level. Indeed, by observing how this level evolves over time, like many elements of Tetra Master, it’s very difficult to understand how this counter changes (once again, we’re faced with a rather convoluted rule).
Even more amusingly, you can quickly realize that the three summary elements (wins, losses, and draws) don’t actually affect this score. Indeed, there are several situations where the outcome of a match won’t change the level. And yes, as is often the case with this game, why settle for something simple and deducible when you can choose a metric that’s completely all over the place? To put it simply, the level is determined by the cards you own, according to a very specific mechanic that we’ll now detail without further ado.
The Different Levels
Before explaining how to calculate points based on the cards you own, here is the list of different levels you can reach in the game. Remember, your card level has no impact on the actual gameplay.
| Minimum Points | Collector Level |
|---|---|
>= 0 |
Beginner |
>= 300 |
Novice |
>= 400 |
Player |
>= 500 |
Senior (developper) |
>= 600 |
Fan |
>= 700 |
Leader |
>= 800 |
Coach |
>= 900 |
Advisor |
>= 1000 |
Director |
>= 1100 |
Dealer |
>= 1200 |
Trader |
>= 1250 |
Commander |
>= 1300 |
Doctor |
>= 1320 |
Professor |
>= 1330 |
Veteran |
>= 1340 |
Freak |
>= 1350 |
Champion |
>= 1360 |
Analyst |
>= 1370 |
General |
>= 1380 |
Expert |
>= 1390 |
Shark |
>= 1400 |
Specialist |
>= 1450 |
Elder |
>= 1475 |
Dominator |
>= 1500 |
Maestro |
>= 1550 |
King |
>= 1600 |
Wizard |
>= 1650 |
Authority |
>= 1680 |
Emperor |
>= 1690 |
Pro |
= 1698 |
Master |
Funny to have so many progression steps for a point system that's so hard to figure out, isn’t it? Once again, we can grumble about the game’s excess of implicit rules, where every design choice seems made to confuse the player. As we’ll see in the upcoming sections, the points calculation is far from trivial!
On the distinction between cards
Before diving into the correlation between the cards you own and the points they yield, it’s important to clarify some terminology. Here are the key elements that define a card for the purpose of point calculation:
- its figure, for example
GoblinorFat Chocobo; - its arrow pattern;
- its type (
XorA).
Cards of type P or M do not provide any bonus points, and the card
statistics (including their evolution) do not affect the point
calculation.
So when we talk about a unique card, we mean a card with a specific figure that you own only once. When we talk about an additional card, we mean a card with a figure that you own multiple times.
Points awarded per card
Points are calculated based on the cards you own and how their arrows are arranged (ouch). Schematically, we can define the axes that earn points as:
-
the diversity of cards you own. Simply put, you can only hold
100cards at once, and there are exactly100card figures (like Goblin). So, to maximize points, you need to have only different figures; -
the diversity of arrow patterns on the cards you own. To maximize points, each card should have a unique arrow pattern (no, this is not a joke);
-
the power level of the cards you own. Cards marked
XandAgive bonus points, so to maximize points, all cards should be levelA(which gives the highest points).
Here’s how a card can earn points — these attributes are cumulative
(except, of course, for the card type, because logically, a card can’t
be both X and A at the same time):
| Attribute | Reward |
|---|---|
| Unique card? | +10 points |
| Unique arrow pattern? | +5 points |
If it’s an X card? |
+1 point |
If it’s an A card? |
+2 points |
Note on Pattern Permutations
A card can have between 0 and 8 arrows. In other words, for
each of the 8 slots, there may or may not be an arrow, which
corresponds to 256 possible permutations. We can easily verify this
by representing each slot as a boolean—0 or 1. If all slots are
filled, we get a sequence of eight 1: 11111111, which is the
binary representation of 255 (since binary 11111111 equals decimal
255). So actually, there are 256 possible combinations from 0
(no arrows) to 255 (all arrows).
We can even describe, by number of arrows, the number of possible combinations with this formula:

This gives us the list of possible combinations for each number of
arrows, showing that we don’t have to rely on weak patterns to reach
the highest level. In fact, there are 163 combinations including
at least 4 arrows:
| Arrows | Permutations |
|---|---|
| 0 | 1 |
| 1 | 8 |
| 2 | 28 |
| 3 | 56 |
| 4 | 70 |
| 5 | 56 |
| 6 | 28 |
| 7 | 8 |
| 8 | 1 |
| 256 permutations |
While to reach the maximum, you need all the cards and they must
all be level A, you only have to worry about about ~39% (100
out of 256) of the different arrow patterns. Nice.
The cherry on top
If you’ve been paying attention, you might have noticed something. We
said each card could earn a maximum of 17 points, and there are
100 cards, so you’d expect a total of 1700 points. But the level
table stops at 1698. So, what happens if you actually reach 1700?
You might expect a big surprise, like a rare item or a congratulatory
NPC. Well, the answer comes from ik141 (as reported in the sombre
document; unfortunately, I couldn’t find the original message), who
took the time to discover the maximum achievable level in Tetra
Master:
So what happens at
1700, you ask? Well, under your collector pts. whereMasterwas written it now says, superimposed over everything, 'Would you like to discard?'. So, after a hundred hours of playing this game I am rewarded with a F***ING GLITCH!!!"
I’m delighted to end this long dive into the rules of Tetra Master on such a cheerful note. You’re not dreaming — the guide where this testimony of frustration was recorded is roughly contemporaneous with the game’s release. ik141’s feat is truly impressive because:
- he didn’t have the guide I used to understand the rules;
- the state of emulation back then wasn’t nearly as advanced as it is today. So, we can reasonably assume (though it might just be speculation) that this card prodigy tried to complete the game, including the Tetra Master quest... the old-fashioned way.
To conclude, finally
A chapter closes. I discovered FFIX over 20 years ago, and every time I tried, Tetra Master always left a bitter taste in my throat. After two attempts (one in 2012 via emulation and another in 2020 on Nintendo Switch) to understand the rules of the game within the game, I gave up and turned to the internet for help. It was a very entertaining investigation that made me question the true quality of the game. Diving into the rules of Tetra Master altered the conclusion I thought I had when I started writing this article. Having been a huge fan of the ninth installment of this saga that marked me so deeply, my frustration and bitterness towards Tetra Master grew. When I first began researching, I was furious about what I read and convinced my conclusion would be scathing. However, probably because I developed a sort of Stockholm syndrome, since learning the rules, I’ve developed a morbid fondness for Tetra Master. I’m very happy to have finally learned how to play it.
To wrap up this article (which took me over 15 days to write, though I took plenty of breaks), I’ll try to give a balanced opinion on the game.
What can we take away from this?
Whether on YouTube or Reddit, opinions are mixed. Some hate Tetra Master, others love it. However, without bad faith, the vast majority of people sharing their views agree on one thing: the game is too complicated and its rules are impossible to deduce. As for me, now that I believe I’ve understood all the game’s rules, I find it hard to consider it a bad game. It’s packed with clever ideas. For example, calculating the collector level based on the cards themselves rather than a simple win/loss ratio allows the score to adjust as you progress, making almost no defeat too punishing.
Another fairly common criticism of the game, as seen in this Reddit thread, is the presence of randomness. At first, I was pretty on board with the idea of bashing randomness. However, with a bit of hindsight, I’ve come to realize that randomness is present in many popular card games. For example, when a game involves a draw pile or the fact that you don’t know your opponent’s hand—and some games rely entirely on randomness (the very popular card game War, for instance).
For my part, what I truly criticize about the game is the impossibility of deducing its rules and the very limited user feedback. I firmly believe that if the game had been more explicit—whether in-game or in its manual—about its rules (and various mechanics), and if the real statistics of the cards were accessible from a menu (and explained, of course), the reception of the game wouldn’t have been so poor. Besides, I’m quite curious about how the presentation (and reception) of the Tetra Master concept went down at Squaresoft.
To conclude, I believe some rules could be simplified, and the game should provide more information and explanations. However, contrary to all expectations, once you know the rules, the game is much more enjoyable than you might imagine. And if you’ve had the courage to make it this far in the article, I’d be curious to hear your feedback on the game experience once you understand the rules!
The Next Part
It’s quite fun to develop an interest in a game by laying out its rules because they were originally incomprehensible. So, it’s possible I won’t stop here. In fact, writing this article has given me the desire — if time allows — to create a free implementation of the game (though it’s likely this project will never see the light of day, due to lack of time and motivation).
Acknowledgments
The first thank you I want to give goes to Trifthen — I have no idea who he is, but without his guide, which has become a go-to reference online for understanding Tetra Master’s rules, I would never have been able to write my own (which is admittedly more naive). The precision and thoroughness of their work sometimes made me want to give up writing this article, thinking I had nothing to add to their document. But hey, my personal site has been pretty dormant, so a bit of content can’t hurt!
Next, to cross-reference the information from Trifthen’s guide, I want to give a special thanks to Antoine for granting me access to resources I unfortunately can’t share in this article, as well as to all the ePSXe maintainers who made it possible for me to navigate internal game data.
My renewed interest in video games — especially JRPGs — was greatly sparked by Bastien, who kindly gifted me in August the excellent book A Guide to Japanese Role-Playing Games. Reading its opening pages instantly inspired me to try making an RPG again — this time giving myself more time than I did for creating Almost Heroic.
I also warmly thank Lorie, who endured my strange obsession one entire evening as I shared a mix of wonder and dread facing the cathedral of complexity that the Tetra Master rules seemed to be. Her attentive listening and questions helped clarify certain points (and some terminological choices), and she kindly offered to proofread, improving my disastrous spelling and awkward phrasing. It’s truly valuable and delightful to have people around with a natural acquaintance for written expression and a love for beautiful sentences.
After publishing this article, I received a collection of reviews and feedback from Hakim, Matthieu, the unforgettable Fenn, as well as from Maël — thank you all!
To conclude, I want to thank all the people who have praised or criticized the game across the various platforms offered by the World Wide Web, as well as the potential readers who managed to digest this very long article on such an outdated topic!
The Final Word
More than twenty years later, a chapter closes. It’s hard to see myself as an adult without having understood the rules of Tetra Master. Now it’s done! I can finally focus on less interesting and less formative projects! Jokes aside, I really enjoyed this work of archaeology, writing (and a bit of implementation). It was a lot of fun, and I’ll try to be more consistent with my writing, maybe continuing to describe game mechanics! Thanks again for reading, and enjoy the heatwave!